Aerial Perspective/ Skyscraper Drawing (courtesy of Silicon Valley Art Museum)
*pencils, paper, markers
Read Above San Francisco by Nina Gruener & Robert Cameron for inspiration. Children draw 7-9 parallelograms. The parallelograms will become the rooftops of buildings. They then draw vertical lines down from 3 corners of each roof. They can add details like windows, rooftop gardens, the Golden Gate Bridge, etc. Complete by outlining in marker.
Golden Gate Bridge Painting
*cardboard (3"-5" in length & about 1" wide), red paint, paper plates/palettes, 9x12 paper (white or light blue)
Discuss the history of the Golden Gate Bridge (took 4 years to build, completed in 1937, at the time was the longest suspension bridge, connects SF to Marin County). Vocabulary= towers (2), deck (roadway), 4 rectangles cut out of towers above deck, "X" below the deck on tower, diagonal and vertical lines in deck, curved cables, suspenders hang down from curved cables.
~Note: example of cardboard/painting tool is shown in last photograph.
~Examples are from Kindergartners & 3rd graders
Step by step directions:
1. paint 2 towers (no designs) - note each tower can be the same height or one can be shorter to show perspective
2. Paint deck with 2 horizontal lines
3. Add details such as rectangles in upper towers, "X"s on lower towers, lines in deck
4. Place a dot on left corner of each tower (this part lights up at night). Connect with a "U" shaped line by dragging cardboard. Stop in the middle to reposition cardboard. Make dots in right hand corners and connect with another "U".
5. Don't forget to draw cables going off the page from each corner of tower (in opposite direction of the last one)
6. Paint a few suspenders.
7. Add any other details you feel necessary.
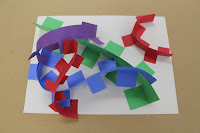
3D Paper Sculpture
(inspiration from the slides of SF, curvy Lombard St., & Golden Gate Bridge)
*colored construction paper 9"x12", scissors, scotch tape
Activity 1 (directly above): Provide or have kids cut 1.5"-2" wide strips of paper (of various lengths). Fold strip of paper lengthwise and then make cuts on only one half of the paper, about 1" apart. Fold each "fringed" piece in opposite directions. Arrange and tape strips of paper onto background paper.


Activity 2 (directly above): Kids make 2 sets of parallel cuts on two different sides of the background paper. They then cut (or teacher can provide strips already cut) colored paper into strips about an inch wide (and about 12" long). The strips of paper are arranged on the background paper, starting by sliding the first two strips under the cuts. The strips can twist and turn, be accordion folded, etc. They are taped down and a whimsical relief sculpture is created. This is a great lesson for kindergartners - 2nd grade.


No comments:
Post a Comment